How to Understand, Read, and Refine a Landscaping Estimate

Hooray, your design is ready! Next steps: find a contractor and get a cost estimate. 

Here, we teach you how to read a landscaping estimate to ensure that you understand the scope of work and exactly what you’re paying for when working with a Yardzen Pro Netowrk contractor.

As part of any Yardzen package, we offer a free bid review service, and we are always happy to assess any bid you receive for best practices and fair market values. 

What is a cost estimate?

A cost estimate, or “bid”, is a document a landscape contractor provides to their client before installation can begin. 

Most estimates list each item or task required to install a landscape design. Line items in these estimates usually include a quantity, unit price, and total estimated cost, so the client can understand the individual cost of every component of their design.  

Some cost estimates are more general, and do not include pricing per line item, but this is less common.

What line items will I find in an estimate?

Estimates typically include line items for each permanent feature of your Yardzen design. This includes planting, structures (decks, pergolas, built-in planters or seating), paving, fire pits, outdoor kitchens, sport courts, hot tubs, or other similar features.

Estimates are organized into themes to make them easier to understand. Some separate planting expenses from hardscape expenses, others list items by which part of the property they relate to (front yard, back yard, side yards).

In addition to design elements, estimates include features that are required to make your design possible: irrigation, drainage, demolition, waste disposal, grading, soil preparation, and more.

Costs related to the contractor’s work are also included: site setup and cleanup, equipment provision, portable restrooms, and office administrative fees.

Estimates do not include furniture, decorative items, or other elements that don’t require professional installation. Such items are sourced and purchased directly by clients.

Does an estimate include more than costs and quantities?

Yes. Estimates also provide descriptions of the work to be done. 

For example, an estimate for a concrete patio will include the area, cost per square foot and total estimated cost of the concrete, but it will also briefly describe the base beneath the concrete, the depth of concrete to be poured, the placement of rebar within the concrete, the surface finish of the concrete, and the strength standard to be met by the finished patio. 

Interpreting estimates

Estimates use concise text typical of construction documents. For example, a concrete patio could be described like this:

Concrete: approx. 290 SQF 

Broom finish concrete

18” rebar on center

4” slab 2500 psi concrete

The terminology and level of detail can be overwhelming to some, but you can always contact your contractor or Yardzen if you need help understanding your bid. 

What if I’m not comfortable reviewing an estimate?

We encourage all clients to take a stab at reviewing their estimate, as it prepares them to be a collaborative partner to their contractor.

This being said, Yardzen offers a free bid review service, and is happy to assess any bid you receive for best practices and fair market values. 

How does a contractor prepare an estimate?

Contractors begin a project with a visit to the site and a review of the proposed design. They then prepare and share an estimate with the client, using their professional expertise to determine material costs and labor hours. 

Do estimates vary from contractor to contractor?

Yes. While estimates all provide similar information, some are more precise, others more general. Each contractor has their own preferred estimate format. 

A lack of detail doesn't necessarily indicate an unprofessional estimate. Some contractors prefer to discuss details in person or over phone/email, or they include the minimal amount of information to reduce administrative work and dedicate more time to building.This is especially true on smaller scale projects.

The actual costs listed in an estimate also vary from one contractor to the next. This is part of why it is good to be a little flexible when approaching a project budget.

How precise is an estimate?

Prices and quantities in an estimate are… estimated. A contractor takes site measurements to make their estimates as accurate as possible, but the quantities and expected costs listed in an estimate may ultimately differ from the final quantities and costs of an installed landscape.

What if the estimate total exceeds my budget?

Yardzen closely tracks budget throughout the design process, but many variables affect installation costs, from site complexity to access to materials costs. These variables can push or pull designs out of sync with budget targets when contractors develop their estimates. 

Fortunately, it’s easy - and very common - for clients and contractors to work together to develop design adjustments to reduce project costs to hit budget targets. 

Clients can also reduce budget without making changes to the design layout. Choosing more cost-effective hardscape materials and purchasing plants at smaller sizes are common practices to reduce project costs.

How can I make changes to my design?

Beyond cost reduction, clients and contractors commonly make design changes for a variety of reasons - there may be previously unforeseen circumstances like difficult access or rocky soils, or a client may simply want to tweak a few things based on the contractor’s advice.

When changes are desired, it’s common for contractors to simply adjust their work plan to incorporate the changes, especially on smaller projects. When changes need to be documented on paper, contractors can make editorial marks on the client’s CAD plans and the Yardzen team will update the CAD free of charge. 

After determining design adjustments with the client, the contractor will provide an updated estimate. Revised drafts of estimates often indicate items that have been removed, so the specific savings from each omitted item is readily visible.

What happens once we agree on an estimate?

When the client and contractor finalize design adjustments and land on a plan that works for everyone, the contractor then provides a finalized estimate or contract to sign. By signing the final estimate or contract, the client officially hires the contractor for the installation. 

With contract signed, the client and contractor then schedule a date to begin installation.

What if the final installed price differs from the estimated price?

The type of contract you have determines how price differences are handled.

Under a “Time and Materials” contract, the estimated price is not final, and the client agrees to pay whatever the final cost may be after installation, using agreed-upon rates for time spent and materials used. 

“T and M” contracts include “allowances” for items where the cost cannot be easily estimated before installation. The exact cost of pavers, for example, could be an allowance - the pre-installation estimate would take a best guess at paver price, but the client would pay whatever the final paver cost ends up being after installation. 

A fixed price contract agrees to a fixed final price for the entire project before installation begins. Under fixed price contracts, a change to the project scope during installation gets documented through a “change order”, which essentially adjusts the contract to set a new fixed price that incorporates the scope change. It’s common for contractors to charge a fee to process change orders, so they are best avoided.

In practice, small changes are often accommodated without the hassle of a change order - in this case contractors just tack extra expenses onto the final project invoice.

On occasion, you may find fixed price items and time and materials and allowance items within a single contract. Counterintuitively, this can lead to a simpler overall contract experience, depending on the project.

Parting Thoughts

Learning to understand estimates expands your understanding of the work required to install your project, and will allow you to work more productively with your contractor. It may take a little time to get comfortable navigating estimates, but the time spent is worthwhile, and leads to more successful project outcomes.

The Build Process: Working with a Yardzen Pro Network Landscape Contractor

You’ve received your final Yardzen design - now what? Through Yardzen’s Pro Network matching service, included in every Yardzen package, you can connect with a top-rated local landscape contractor to install your design. 

Our goal: make the entire build process efficient, successful, and delightful.

Below, we’ll break down exactly how Pro Matching works, share some tips from our Pros, and answer a few common questions about the build process. And, be sure to check out our blog about Preparing for a Home Renovation, too!

THE BUILD PROCESS:

Step 1: Give us the Green Light 

As soon as you’ve received your final design, your team will get to work connecting you with a contractor. Because the complexity and cost of a project can change a lot during the design process, it’s important to wait until you’ve received your final designs before advancing to Pro Matching. This sets you up for a smooth start with your Pro.

Yardzen Pro Network contractor Chelsey Roney of Stone Creek Landscaping

Step 2: Yardzen Finds your Contractor

Pro Matching begins with finding the very best contractor for your job. 

Every Yardzen Pro is rigorously vetted to verify their professionalism, craftsmanship, and customer service. We keep tabs on customer reviews - only Pros with ongoing great scores remain in Yardzen’s Pro Network. Where legally required, we also confirm that our Pros have appropriate licensing, insurance, and bonding.

 Contractors often have particular areas of expertise - one may excel at concrete work, another at decks. We closely assess your design and project scope, and cross-reference your needs against contractor expertise. We also factor in your timeline, contractor availability, and location. Weighing all of this information, we determine which Pro from our Network is the absolute best fit to take on your project.

Step 3: Connect with your Contractor

After hand-picking your Pro, Yardzen contacts them about your project. It typically takes 2-3 weeks to receive a confirmed response, but it can take longer depending on a Pro’s availability. As this process unfolds, we’ll stay in touch with you via email to keep you updated on progress. 

As soon as your Pro agrees to take on your project, we’ll send an email introducing you to each other. From there, you’re off and running, and can schedule meetings directly with your Pro. 

To make sure you remain happy with your Pro, we’ll stay CC’d in your email correspondence - consider Yardzen a resource to support you throughout the entire build process.

Step 4: Bid

Every contractor works differently, but they usually begin with a site walk of your property. 

Following the site walk, your Pro will provide an estimate for you to review. This estimate will account for all the elements from your design, along with other necessary installation items, including (depending on the project) demolition, grading, drainage, irrigation, lighting, plumbing, and soil preparation.

After receiving an estimate, it’s common to enter a negotiation period in which you collaborate with your Pro to adjust your design to meet your specific goals. This is where you may make changes to bring costs down, should budget be a concern. 

To help you through the bidding process, we offer a Bid Review Service free of charge. If you’d like a second set of eyes to confirm the fairness of your bid, we’re happy to assess it for market costs. 

Step 5: Contract

After arriving at an agreement with your Pro, they’ll provide a contract. Once you’ve signed their contract, you’ve effectively hired your Pro, and can move on to scheduling your installation.

Step 6: Scheduling 

Seasonality and contractor availability affect scheduling. In colder climates, work often must pause through the peak of the winter. Since Covid, contractors have been particularly busy, contributing to longer lead times. 

Our advice is to begin your design process far in advance of when you want work to be completed - this provides cushion for unforeseen delays in getting your project started.

Step 7: Installation

Once work begins, it can move quickly or slowly depending on the project. 

As a general rule, expect to complete roughly $10K worth of work per week - if your project was bid at $50K, it would probably take about 5 weeks to complete. This being said, if your project involves slopes or other complex factors, it is prudent to expect a slower pace.

Check out our guide to Preparing for a Home Renovation, too!

Tips from Our Pros:

We asked our contractors how clients can contribute to a successful project. Here are some highlights:

  • Be flexible. Our Pros make every effort to follow your design precisely, but there are often legitimate reasons for the installation to make diversions from the design. Set flexible expectations of the final product. If things don’t exactly match your designs, but the end result is a beautiful, high-functioning yard that fulfills your needs and vision, then the installation is a success. 

  • Collaborate. Contractors are partners, not commodities. They want a successful outcome as much as you, and work hard to get there. Stay engaged in the process and maintain mutual respect, and you’ll have a more harmonious and successful project.  

  • Let go of perfection. Small imperfections are common in landscape construction. If something looks off or bothers you feel free to bring it up to your Pro.  Often there is a logical but not readily apparent reason for things being done in unexpected ways. Major mistakes should be corrected, but try not to sweat the small stuff too much.

  • Be forthright with payment. Offering to pay before a contractor asks shows goodwill. A simple, "let me know when you need a check" can go a long way.

  • Show appreciation. A box of donuts, cold drinks for the crew or a "the new deck looks great" shows gratitude. Small gestures make your build team feel appreciated, and motivates them to do the best job possible.

  • Communicate respectfully. Asking questions is great, but do so without questioning the contractor's ability. Questions like “Is this plant going to die if you plant it like that?" erode trust, and lead to less successful outcomes.

FAQ:

What if there are no contractors in my area? Yardzen’s Pro Network is growing by the day, and we work diligently to connect our clients with the right contractor for their project whenever possible. Should circumstances prevent us from connecting you with a Pro, we’ll reach out directly to discuss possible next steps. Typical issues that can delay a Pro Match include a project site being distant from an urban center, or a project being exceedingly challenging due to budget constraints, site conditions, or design complexity.

What if I don’t like my contractor? If you are unhappy with your Pro, please let us know and we’ll help you to navigate the situation. Should you wish to work with a different contractor, we’ll do our best to connect you with a new Pro, but cannot guarantee a second match. You are also free to search for your own contractor, and we’re happy to help by vetting anyone you find.

What if I want to compare bids before signing a contract? We support any client who wishes to compare multiple bids before committing to a contract. Yardzen does not match clients with multiple Pros at a time, but we’ll gladly look at any bids you receive from contractors you find independently to review for fairness. 

How do you design to budget? The Yardzen journey begins with a budget exercise to align you and your design team on approximate costs to expect for your design. Your designer then tracks project costs as they work, and we reach out anytime your budget target feels like a mismatch for your design goals.

Many variables influence final project costs, from material selections, to plant sizes, to unforeseen site complexities. As installation nears, you can get a more precise picture of project costs, and occasionally variables will push a project below or above the estimated target budget. This is very normal, and easily addressed by you and your Pro working together to make design adjustments that balance your design and budget goals.  

What if new issues requiring more budget pop up during installation? Unforeseen expenses are common in landscape installation - expect the unexpected. We highly recommend including a cushion in your project budget to absorb unforeseen costs; this is a common practice in the construction industry. If drawing from a cushion fund is not viable, you can work with your contractor to cut costs from your design to free up budget to cover unforeseen issues. 

What if I want to make changes pre-install to reduce costs? The most common and simplest method to make pre-installation design adjustments is to simply talk through changes with your Pro, who will incorporate them into your installation. If you need to capture changes on paper, you and your Pro can make editorial marks on your final design’s CAD drawings, and send them to your design team, who will provide updated CAD drawings for you free of charge (this process is called “redlining”). 

Do I need a minimum budget to work with a Pro? Yardzen creates designs for clients with a wide range of budgets, but we recommend having a minimum of $15,000 to spend in order to be matched with a Pro in our network. Check out our Guide to Landscaping Costs to figure out what a realistic budget is for you.

Can I phase my project? As we’ve mentioned before, phasing increases lifetime project cost by repeating set up and clean up expenses, but for many it is the best path to achieving a complete landscape vision. If you choose to phase, we do recommend budgeting at least $15K for the initial phase.  

How do you handle permitting? Permit requirements vary from one regulatory agency to the next, but it is typical for permits to be required for new plumbing, electrical, or structural features, including walls above 3’ tall and closed-roof outdoor structures. If your project requires permitting, we’ll aim to match you with a Pro who will be able to assist with securing the necessary permits or guiding you through the process.

What if I want to DIY? DIYing can actually be more expensive, especially when factoring lifetime costs. Licensed contractors get landscape materials at wholesale prices, and can insure the longevity of their work. DIYing leaves you paying retail prices, and on the hook for future repairs. DIY demolition may seem like a savings, but it typically skips crucial grade preparation that contractors must go back and complete, undoing the savings from your hours of demo labor. Unless you have significant landscape installation experience, we strongly encourage hiring a professional.

Wood vs. High-Performance Composite Decking

A high-performance composite deck by our preferred vendor, TimberTech®

By Kevin Lenhart, PLA, Yardzen Design Director

Traditionally, we’ve used wood to build decks, but does that mean it’s the best material for the job? The short answer: no! Composite materials, like TimberTech® decking (our favorite of the products out there), are growing increasingly popular, and for good reasons. High-performance composite is superior to wood as a landscape building material, from the sustainability benefits to design versatility to lifetime value.

Below we’ll compare the two materials to help you understand which one makes sense for you.

A high-performance composite deck that stands up to the weather conditions in Ohio

Durability

High-Performance Composite

The lifespan of composite decking varies with the product, but it exceeds that of wood, often significantly. Depending on the product, TimberTech decking has an expected lifespan of up to 50 years, including a 50-year warranty for fading and staining. Their AZEK line in particular has a lifetime product warranty. By offsetting replacement by a decade or more, choosing composite decking equates to less resource consumption and fewer materials ending up in the landfill.

Composite decking repels moisture and resists weathering and mold better than wood. You never need to paint or stain composite to protect it from the elements. This deferred maintenance adds up to lower lifetime costs than wood, not to mention less hassle. 

Wood

Wood is a porous material, and over time it weathers from exposure to the sun, wind, and precipitation, particularly in more inclement climates. Wood can also develop mold from the absorption of moisture. Maintaining the integrity of a wood deck requires a new coat of paint, stain, or sealant every 1-2 years. And, typically requires replacement every 10-15 years (though wood type does affect longevity and susceptibility to mold, cracking, and weathering).

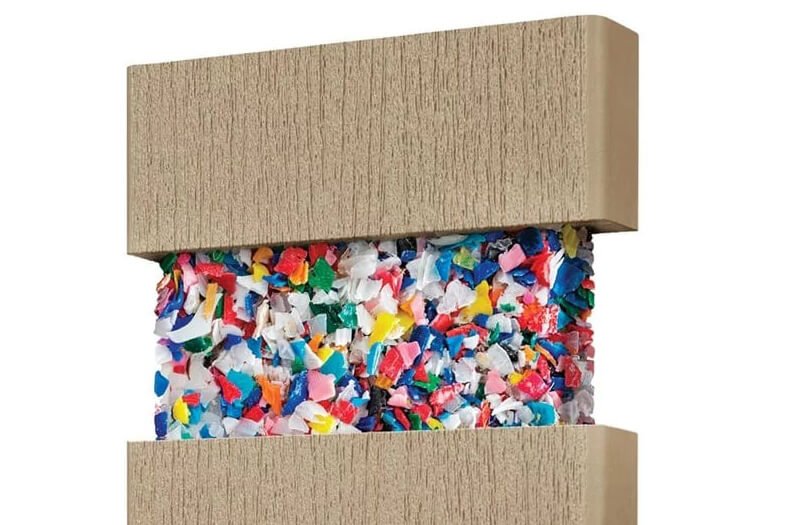
TimberTech’s capped composite decking is made of up to 80% recycled material

Sustainability

High-Performance Composite

Composite decking is manufactured, not harvested like wood, overcoming the major environmental issues surrounding timber production. The sourcing and production of composite create significant sustainability opportunities, including resource conservation, water conservation, and forest preservation. TimberTech uses up to 80% recycled material in their capped composite decking and up to 50% recycled material in their capped polymer decking, recycles nearly all of the water used in their manufacturing process, and in the last twenty years has saved an estimated 3 million trees’ worth of decking.

Purchasing composite decking casts a vote for forest ecosystem preservation, biodiversity, and fighting back at climate change.

Wood

Worldwide, timber is commonly grown in monoculture plantations, where native forests with diverse plant and animal populations are cut down and replaced by stands of a single tree species. This practice leads to a host of environmental issues, including:

  • Erosion pollution in waterways

  • Biodiversity and habitat losses 

  • Reductions in carbon sequestration

  • Emissions of carbon (some 15% of global greenhouse gas emissions)

It's certainly possible to manage timber plantations more ecologically, but any plantation pales in comparison to natural forests for carbon sequestration, habitat provision, and overall ecosystem services. To that end, wood certified by the Forest Stewardship Council has been produced in a comprehensively sustainable manner. Sadly, this represents only a fraction of the global timber supply. On the contrary, wood is often grown and harvested illegally in defiance of environmental protection laws--this is particularly common with tropical hardwoods, whose demand from Western consumers has driven a spike in black market production.

A high-performance composite deck creates endless design opportunities

Design

High-Performance Composite

High-quality composite decking offers the luxurious look and feel of traditional materials while having the added benefit of durability and long-lasting beauty. This means that its color and texture are resistant to fading.

High-performance composite materials also have more stylistic diversity than wood, coming in ranging colors, sizes, and textures. TimberTech decking exudes authenticity, with subtle color variation, realistic wood grain patterns, and textures that look and feel natural. As with wood, the many options that TimberTech offers allow it to look equally fitting in any design style.

In terms of design convenience and versatility, composite is tough to beat. Designers and homeowners can quickly browse a vast catalog of decking colors and finishes, easily access samples of their favorite options, and find railings to complement their decking selections. 

Wood

Wood can be beautiful when well-maintained. It also works in any design style, from the most traditional to the most modern. However, left unattended, wood weathers, splinters, and deteriorates from rot.

Ease of Use

High-Performance Composite

Not all composite decking is the same when it comes to installation--some products have specific installation systems that contractors may not be familiar with. We like TimberTech because it can be installed just like a standard wood deck--no custom system, no fuss. 

Our contractors have shared that TimberTech is easier to cut than some types of wood, and it can be heat bent to accommodate curved designs, offering greater flexibility than wood. We also hear from contractors that they receive fewer client call-backs on composite decks due to the durability and lack of splintering. (No splinters is a big win for composite!)

Wood

Contractors are familiar with wood and know how to build decks with it efficiently. That said, their workflow must include taking measures to protect both the structure and surface of wood decks from moisture and weathering damage, generally by applying waterproofing paint, stains, or sealants. 

When working with hardwoods like ipe, contractors must also factor in added difficulty to cut and drive fasteners into the dense material. Post-installation, wood decking is frequently a source of fix-it calls from clients, who encounter splinters or boards that have broken down from exposure.

A high-performance composite deck by our preferred vendor, TimberTech®

Price

High-Performance Composite

High-performance composite has a competitive purchase price, and when you consider the lifetime savings from deferred maintenance and superior longevity, it becomes clear that composite is a cost-effective decking option. 

Wood

Wood requires frequent maintenance and only has a lifespan of 10-15 years, making it a more expensive and resource-intensive choice in the long run.

This blog post is sponsored by TimberTech.

Preparing for a Home Renovation

Renovating your landscape and home exterior is a team effort. As the client, there’s a lot you can do to make a renovation run smoothly, for yourself and your contractor.

Before Design

Identify your goals and priorities. Take time to define the look, feel, and function you hope to achieve, and stay focused on these goals, from the start of design to the end of renovation. 

Keeping an eye on the big picture and letting your priorities guide decision-making keeps you flexible and receptive to advice from the pros you’ve partnered with, which is key to a successful project outcome. 

Set your budget. Budget can adjust over the lifespan of a project, but it’s crucial to start the design process with at least a rough target in mind. Your design and build partners can advise you on how to remain on budget, and help you to decide if adjusting a budget is a good choice to achieve your goals. 

Remember to allocate a cushion to account for unexpected expenses.

You may also want to consider financing. Exterior renovations increase property values  and curb appeal, and can make for a cost-effective investment for many homeowners. (You can learn more about financing Yardzen designs through SoFi here.) 


After Design, Before Contract

Pro Match with Yardzen. “Pro Matching” is Yardzen’s term for the process of connecting you with a vetted landscape contractor to install your design.

Pro Matching is included with ever package, and saves you the time and hassle of trying to secure a contractor on your own.

To find the right pro for your project, Yardzen takes a close look at your design, considering its scale, complexity, and particular features, and balances those factors against the strengths and availability of pros in your region to find the one who is the absolute best fit.

You can initiate Pro Matching as soon as you receive your revised designs - just let us know when you’re ready to get started and we’ll get to work connecting you.

Get started with the build team. When you use Yardzen’s complementary Pro Matching service to connect with a contractor, you’ll also get the ongoing support of Yardzen’s Build Team. Consider the Build Team a resource to support you throughout the entire installation process.

Need to make some adjustments to your design? Yardzen is happy to lend a second opinion to help you confirm changes you develop with your contractor. Need to adjust your plan drawings? Tell us the changes to make and we’ll quickly provide you with new plan drawings capturing your updated design. Need a second set of eyes on your cost estimate? The Build Team will happily review any bid you receive to make sure you feel secure before moving forward with your contractor.

For these or any other issues that may come up during the installation process, simply contact the Build Team and they’ll assist you right away.

Choose your materials. Look at samples of paving styles and materials, paint, and other building materials and confirm your choices. Confirming specific items helps contractors make accurate estimates. 

Make last-mile adjustments. Once you connect with a contractor, work with them to decide on any final design adjustments to get everything ready to install. You may tweak details to better fit the site, or swap in new materials to hit budget targets. 

Take your time to get all the details set. Confirming changes before work begins avoids the hassle and expense of mid-construction change orders, which benefits both you and your contractor.

Plan for permits. Work with your contractor to identify any permitting that may be necessary, and set a plan to handle the permitting process in a timely manner. Make sure it’s clear to everyone who is responsible for dealing with the permitting process. 

Align on a work plan. Confirm the installation plan, timing, and costs of your project with your contractor. 

Each contractor may include less or more specificity in their contracts - this is fine, just make sure you and your contractor have a shared understanding of how the project will unfold. Being an active and informed client who understands the details of their project will lead to a better outcome.

Schedule work. Once you sign your contract, set a date for your renovation to begin. 

Many factors affect scheduling, including contractor availability and seasonality. We recommend starting your design project well in advance of the date when you’d like your renovation to be complete. This leaves room for any delays that may arise. 

Before Installation

Establish communication. Make sure your contractor has an easy and consistent way to get a hold of you throughout the entire project.

Prepare your yard. Remove leaf litter and other debris to provide a clean starting point for your contractor. Relocate any large items or clutter that may get in the crew’s way. 

If you have pets, be sure to clean up after them throughout the installation - for many contractors, pet mess is a pet peeve.

Provide clear access. Clear a broad, safe path from the street to the work zone. If heavy equipment is needed, work with your contractor to establish proper equipment access. If you are replacing windows, provide clear paths to the interior side of each window.

Protect valuables. Remove valuable or fragile items from your yard to avoid damaging them. If you are working on your home (roofing, siding, windows), it can be wise to take hanging items off the wall to avoid them falling.

Clear your driveway. Make your driveway available for accepting material deliveries, staging, or other work-related tasks. If you’re replacing roofing, your driveway will likely need to accommodate a dumpster to dispose of removed roof material. 

Provide utility access. Make sure your contractor can find electrical, HVAC, and plumbing controls, and provide them with suitable electrical outlets in the work zone. 

Plan for parking. Provide a convenient place for the contractor’s crew to park, minimizing impact to your neighbors. Don’t forget to plan for your own parking, too.

Designate crew spaces and family spaces. Provide a restroom exclusively for the workers - this could be a portable unit in a convenient but discreet outdoor location, or an indoor restroom. If using an indoor restroom, choose one near an exterior door with a clear path that can tolerate some dirt.

Some clients allow crews to use other indoor spaces like the kitchen. This is your prerogative, and not required. Talk with your contractor to establish boundaries in the house before work begins. 

Adapt to less space. Parts of your yard or home may be unavailable during renovation. Plan ahead so you can comfortably adapt to these limitations. 

Set limits for kids and pets. Keep kids and pets out of the work zone. Dogs should remain comfortably separated from workers  - nobody wins if the dog is left to bark all day in a pen next to the work zone. 

If climate and availability allow, it can be advisable to schedule work during the school year when kids are not home as often.

Be a good neighbor. Give your neighbors plenty of advance notice about forthcoming work, and do what you can to mitigate noise, debris and crowding on the street that may impact them. Gifting a bottle of wine before work begins is a nice touch.

During Installation

Image via KB Contractors TX

Be available. Projects are most successful when clients are around to quickly answer contractor questions. Be an engaged and collaborative partner with your contractor. If change orders do arise, handle them quickly to keep things moving forward efficiently.

Be patient. Renovations can be noisy and messy, sometimes for weeks. 

You’ll also have people all over your property, and will experience less privacy than you are used to. 

Do your best to take disturbances in stride - remember, they won’t last forever!

Be flexible. Rarely are designs installed exactly as a designer envisions. That’s ok! Stay focused on your goals and maintain respectful, consistent dialogue with your contractor. Together, you’ll be able to figure out solutions to all the tricky situations that inevitably pop up. 

Show gratitude. Be proactive with payment - a simple “Let me know when you need a check” is always appreciated. 

Be generous to the crew by sharing positive remarks, cold drinks, or an occasional box of donuts. Small gestures of thanks contribute to a happier and more productive work environment.  

15 Gift Ideas for Dog Lovers

With over 54% of clients requesting pet-friendly yards, Yardzen knows a thing or two about four-legged fur babies. If you're looking for gift inspiration for the pet parents on your list, the pet-loving-staff at Yardzen put together our top gift picks for the dog devotees in your life. 


See what made the list!

GRAND CANYON NATIONAL PARK DOG KUDDLER from Pendleton

This statement-making dog bed from Pendleton features an easy step-in design with wrap-around bolster for comfort and security pups love.

Compostable Dog Poop Bags from Boba&Vespa

These Compostable Dog Poop Bags are 100% Certified Home Compostable and have have been engineered to ensure that they will decompose in both aerobic and anaerobic environments. This means that they will completely break down in a landfill as well!

No matter how you dispose of them, these bags will decompose in 3-6 months!

Handmade Ceramic Dog Bowls

We're in (puppy) love. With its wheel-thrown shape and creamy dipped glaze, this dog bowl is a real treat. It’s got a raw stoneware base, too—which, happily enough, offers a lil’ extra grip (perfect for enthusiastic eaters).

It comes in three sizes for pooches big and small, plus it just so happens to be microwave- and dishwasher-friendly, to boot.

Animal Wash from Aesop

Pamper your pooch with Aesop’s Animal wash. Featuring Lemon Rind, Tea Tree Leaf, Spearmint Leaf, this mild skin and fur wash deodorizes and gently cleanses.

tug and toss dog rope toy from Harry Barker

Your pooch will LOVE this exceptionally well crafted toy. Made from 100% azo-free dyes and recycled yarns, this rope toy is durable enough for even the roughest, toughest games of tug-of war. All of Harry Barker’s rope toys can be expected to unravel and help floss dog's teeth.

Nordic Ware Dog Treat Pan

A pan for the puppers. Baking is an act of love, and for anyone lucky enough to have a dog, you know how much you love ‘em. Whip up healthy bone-shaped treats for your four-legged friends in this fun pan from baking maestros Nordic Ware.

Farm Fresh Plush Toys

This delicious assortment of plush toy fruits and veggies are guaranteed to sprout your dog’s interest. Hand-made with a double layer exterior and reinforced stitching for extra durability, all toys are stuffed with eco-friendly PlanetFill® filler made from 100% post-consumer certified-safe recycled plastic bottles.

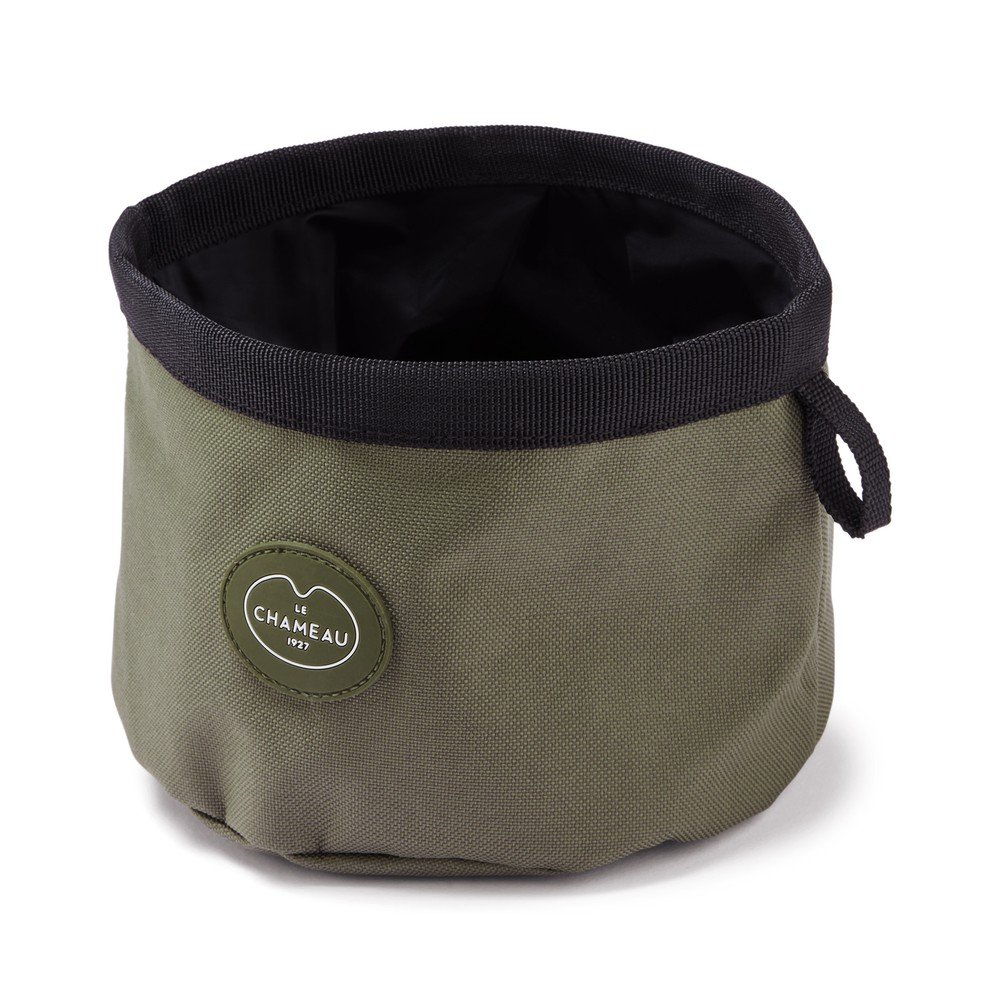
PORTABLE DOG BOWL from Le Chameau

For the adventure loving pup, this portable dog bowl is lightweight, easy to pack and convenient to carry around. Quick-drying and simple to use, this scrunchable bowl is perfect for country pursuits and days out, just fill up with water and your pup is ready to drink.

Infinity Leash by Awoo

One leash to rule them all: Simple adjustments lead to endless possibilities, so you can go everywhere and do anything.

Crafted with 100% GRS-certified recycled polyester created through a process that turns post-consumer plastics into soft, durable yarns and chemically untreated, hand-polished brass hardware.

Holly Jolly Flannel Dog Bandana from The Foggy Dog

Your pup will have a holly jolly Christmas with this festive green and red plaid bandana. Made from luxuriously thick flannel that's as soft as a cloud.

The Foggy Dog proudly handcrafts its products in the USA, working with skilled craftspeople who are paid fair wages. Wherever possible they use recycled materials, low-waste manufacturing, and natural fabrics to create products you can be proud to have in your home. And of course, every order helps a shelter pup in need.

Quilted Pet Jacket by Psychic Outlaw

Psychic Outlaw is an Austin-based company that turns old quilts into beautiful clothing! Keep your pet looking dapper in this custom pet jacket which can be personalized with your pet's name to the collar.

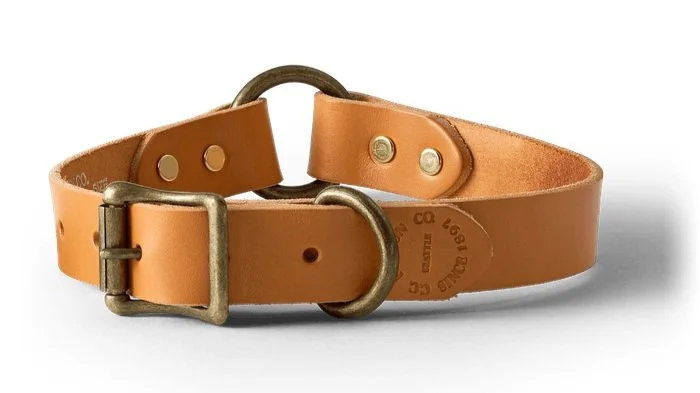
BRIDLE LEATHER DOG COLLAR from Filson

Filson’s 1"-wide dog collar is made with USA-tanned, saddle-grade Bridle Leather for maximum durability. It features a safety O-ring for inversion if your dog catches it on a branch, and a D-ring lead attachment.

Original Recipe Dog Treats from Jiminy’s

For the dog with the discerning palette, these yummy high protein treats made with ingredients like crickets and lentils are sure to be a hit.

Dirty Mouth Dog Toothpaste

Give the gift of a bright smile, and fresh breath! This luxurious dog toothpaste is all-natural, vegan, organic, and keeps your dog's mouth clean with lasting fresh smelling breath. 

Jive Dog Ball from West Paw

For the pooch who loves to play, Jive's erratic bounce makes chase and fetch way more fun! Safer and tougher than a tennis ball, Jive is one of the most durable balls on the market.

Made with zero-waste and recyclable Zogoflex® material in Bozeman, Montana, this certified B Corp manufactures all of its toys to be infinitely recyclable—meaning when you send your worn-out toys back to them, they sanitize them, grind them up and turn them into more things dogs love.

Modern Front Yard: Landscaping & Exterior Design Ideas and Inspiration

Modern front yard landscaping for this Yardzen yard in Austin, TX

Looking for more of that modern “wow” factor from your front yard? We’ve got a few suggestions for you.

Get started on your modern front yard today with Yardzen’s Curb Appeal package!

A modern Yardzen front yard

What is Modern?

Straight lines, minimal ornamentation, free-flowing layouts, and dissolved boundaries are characteristics that spring to mind when we think of modern design. 

You can hang on to these basic traits and still have plenty of room to play within the modern category: 

  • Some modern designs are formal, with recognizable geometries and patterns everywhere, particularly in planting design. 

  • Others are informal, playfully juxtaposing the rough and wild with the clean and crisp - this is where you’ll see stainless steel rails above rusty corten walls, swooping meadow grasses hemmed in by rigid paver paths. 

  • Even when skewing wild, modern designs evoke restraint and control; some designs lean heavily in this direction, pushing all the way to minimalism.

All this variety is a good thing - it means you have options. Below we’ll run through some of our favorite tips to help you get a modern front yard look, whatever type of modern you may be shooting for.

Modern Yardzen front yard in San Jose, CA

Style Indicators

Each component of your yard’s design expresses a style, albeit some more forcefully than others. We’ll start with the big impact stuff, and work our way to the finer details.

Layout

  • Use straight edges, and turn corners at 90 degree angles. This goes for planting areas, paths, seating areas, etc. 

  • An occasional curve is fine, just make it long, graceful, and intentional. Avoid wavy lines.

  • Diagonal lines are playful and give designs something to react to, but don’t introduce too many different angles. Keep your layout simple and legible. 

  • Some designers stagger gapped pavers to provide an angled or curving path. If you go this route, keep plenty of overlap from one paver to the next, so you can walk in a straight line without having to zig-zag. 

Front yard paving for this organic modern front yard by Yardzen

Paving

Check out our Complete Guide to Paving to learn more!

  • For paving, walls, and more, concrete is the go-to modern material, but don’t overdo it. Pair large concrete pavers or slabs with smaller pavers. This provides contrast and humanizes the paving scale in key areas.

  • Default to paving in cool gray tones, bright or dark. Choose precast pavers in three different shades of gray (not too contrasty) and blend them within a fixed paving pattern to evoke the natural color variability of stone. Or, if budget allows, get actual stone pavers cut to rectangular dimensions (natural-shaped stone skews traditional).

  • Rustic modern designs should mix in some decomposed granite or gravel as a rough counterpart to crisp pavers or concrete. Formal designs should lean on larger pavers, avoid gravel or DG, and use stone for marquee areas.

  • Gray isn’t the only way. Look to the regional landscape for color guidance - warm neutrals in the southwest, darker grays in the northwest. This goes for pavers, stones, and aggregates like gravel or DG. 

Metal railing in this Yardzen front yard in Oakland, CA

Metal

  • Corten and raw steel scream rustic modern. Use either for low retaining walls, stair risers, or edging, and pair with gravel or decomposed granite. 

  • For a literally more polished look, go with stainless steel. Stainless steel cable handrails offer supreme visual permeability - you’ll barely notice they’re there. They are an investment, but can be worth it in short runs when the goal is maximizing key views or strengthening connections between high and low spaces.

  • Black metal works in any flavor of modern design - it more or less vanishes when anything more interesting to look at is placed nearby. Black metal fences with wire grids or horizontal pickets (explore our Guide to Fences) cost more but look more elevated than your standard vertical picket black metal fence. Don’t get too chunky or tricky when using black metal - less is more.

A modern wood fence in this Yardzen front yard

Wood + Composite Decking

  • Wood is a highlight material, a spot of warmth in a modern design. 

  • Use wood for fences, decks, and retaining walls, just avoid any ornamentation. Corners should be a clean 90 degrees, post caps should be minimized, and when cost allows, fence boards should be mounted horizontally instead of vertically.

  • For a formal look, select hardwoods, or stain cedar to look like hardwood. For rustic modern designs, reclaimed or weathered wood looks handsome.

  • To save on cost, hassle, and environmental footprint, we advise going with composite decking in lieu of wood - TimberTech offers a particularly attractive range of colors and finishes.

A charcoal-colored home exterior for this modern Yardzen front yard

House Color

Explore color options for your exterior with a Yardzen Curb Appeal package!

  • In terms of curb appeal, house color is a major mood setter.

  • White, black and various shades of gray are all safe bets for setting a modern impression. 

  • If you want more color, try a dark blue. Alternately, keep the house neutral and splash an accent color on your front door.

A modern Yardzen front yard

Planting

  • Modern planting designs tend to feature fewer blooms, and place more emphasis on texture, height layering, and foliage color. 

  • Informal modern designs emulate wild planting, often in a simplified interpretation. Tall ornamental grasses are popular, planted in monolithic blocks or interspersed with occasional accents from flowers or sculptural succulents. 

  • For a formal modern look, arrange plants in straight rows. People often prefer to leave healthy room between each plant. In shadier zones, you can use smooth gravel or river rock to get more design value from the spaces between plants (rock mulches work in full sun, but only for heat-tolerant plants). 

  • The name of the game is fewer, larger gestures. 

    • Pro Tip: The same rule applies to rocks. Use a few big boulders (2’-3’ or so), placed alone, as opposed to lots of smaller rocks.

A midcentury modern front entry by Yardzen. Learn about this historic Eichler in our blog post!

Windows

Transform your exterior windows with a Yardzen exterior design package!

  • Modern designs aim to dissolve the indoor-outdoor boundary with large windows and doors. If expanding street-facing windows is an option, it can be a major signal of modern design (just be careful to control sun exposure into your home).

  • Choose sleek, durable windows with minimal frame ornamentation. Your eye should be drawn to the glass, not the frame.  

Modern garage door in this Yardzen yard

Garage Door

  • Garage doors often aren’t much to look at, but they’re big and often street-facing, making them a great opportunity to boost curb appeal. 

    • Top shelf: get a new garage door that complements your home’s exterior (Marvin offers several handsome options). Garage doors with rectangular glass or horizontal wood detailing look particularly modern.

  • Simple and Effective: Paint your garage to complement your home’s exterior. You don’t need to draw attention to your garage, just make it feel cohesive with the rest of the yard.

    • Pro Tip: use tall, relatively slender container plants to frame your garage door. If possible, use a species found elsewhere in the front yard - this amplifies the sense of connection to the rest of the yard.

A bold front door for this modern Yardzen property

Front Door

Explore front doors for your exterior with a Yardzen Curb Appeal package!

  • Front doors are focal points, so they have an outsized influence on curb appeal. 

  • Make sure your door is well lit. 

  • Choose a quality door that complements your home’s exterior. This could mean paint to match trim, a bold wood tone, an even bolder accent color, or an alternative material like metal or glass.

  • Don’t skimp on front porch paving, nor on paths to the front door - these are breadcrumb trails for the eye to follow, and get as much scrutiny as your door will.

  • As with the garage door, well-positioned plants - in containers or in adjacent planting beds - can frame or accentuate entry areas. We suggest picking species with some height to them - their scale feels good alongside tall, slender doors.  

Modern Yardzen front yard

Lighting

  • Lighting should do its job at night, and be invisible during the day. 

  • Eye-catching modern fixtures can be great in limited doses, but they are often costly, and become impediments to open flow (especially in small yards). We prefer minimal, black fixtures that fade into obscurity during the day but provide dramatic evening light.

  • Try uplights on prominent architectural features or specimen plants, but don’t go overboard - if everything is accented, nothing is accented. 

  • If you are building anew, try embedding lights in decking, paving, stair risers, or walls. This can be more complex than standard path lighting, but it delivers a strong modern impression.

  • Less is more with light fixtures. Avoid placing path lights closer than 15’ apart, and keep all lights tucked away from foot traffic to reduce trip hazards. 

    • Pro Tip: Whenever possible, use LED lights to save energy, and turn your lights off when you retire for the evening - the local birds and bugs will thank you.

A modern Yardzen front yard with a social front yard and modern door.

Final Details

  • After doing the work to create a yard that feels modern across the board, take care to finish strong by selecting modern details. 

  • Mailboxes, house address numbers, door and gate hardware, and other small items have a meaningful impact on the style expressed by a yard. You don’t need to go top shelf on all of them, but make sure they feel like a stylistic fit. When in doubt, go with basic white, black, or metal features with minimal ornamentation.


Modern design is best achieved when all the elements play their part, and everything in the yard feels like a part of cohesive, considered whole. This emphasis on the cumulative design is why it’s a great idea to design your home exterior at the same time as your landscape!

Guide to Paving: Styles, Costs, and Alternatives

Paving, including concrete, stone, and tile, and paving alternatives, like gravel and mulch, are the materials we walk, sit, cook, eat, and play on in a landscape design. We’ll discuss different types of paving (hard surfaces), and some alternative surface materials that can be used to create functional paths and spaces.

PAVING

Large-format pavers in this Yardzen yard

Large Concrete Pavers: $24 per square foot (precast); $60 per square foot (custom)

People love the look of large rectangular or square concrete pavers set with narrow gaps filled by low planting or decorative rock.

There are two ways to achieve this: precast pavers or custom poured concrete. 

Custom pours require a wood mold for each individual concrete paver - this adds up to a lot of labor. Complex patterns and larger paver sizes require custom pours. Many contractors prefer to always pour, finding it to be safer, easier, and less prone to failure down the road.   

Precast pavers are purchased hard and ready-to-install. Landscape supply outlets typically carry large pavers at 2’x2’, but rarely larger. Some manufacturers make larger paver sizes, but these are typically custom orders whose high purchase and shipping price negates any savings from avoiding a custom pour. 

Once installed, precast pavers are more prone to upheaving or settling independently - the crisp path you begin with may get a little wavy with time if soil is unstable or tree roots are a factor.

Whatever your installation method, so-called “gapped” pavers are better for paths or seating areas where furniture will not be shifted too much. The gaps are not ideal for cooking or dining areas, where a chef could trip or a dining chair leg could slip between pavers. 

Standard Concrete Pavers: $24 per square foot (sand-set); $60 per square foot (mortar-set)

As a category, precast concrete pavers are the most affordable type of paver, though their prices vary with size and style. 

For residential use, pavers are often brick-sized (4”x 8”) or slightly larger. These smaller scale pavers establish a comfortable, intimate feel. 

Want something fancier? Go bigger. The larger the paver, the more formal things feel. 

Modern designs skew toward cool gray tones, while traditional designs often lean on warmer neutrals. Modern or not, it’s a nice touch to select pavers that mimic or complement the regional landscape.

Install pavers with any standard pattern - we often go with herringbone and multi-size Versailles patterns. In many cases, manufacturers design pavers to interlock, even in multi-sized patterns, making installation quick and simple.

Mortar-set pavers are installed above a concrete slab, and cost significantly more than standard sand-set pavers, which rest on compacted rock and sand. The good news is that sand-set is a great approach for most residential paving jobs.

Brick: $24 per square foot

Brick costs and acts like concrete pavers, but conveys a more historic feel. Bold red feels particularly traditional; visible wear and neutral hues feel more rustic and contemporary.

Add a coat of whitewash to give brick a versatile, vintage look. Whitewash leaves brick a pale pink with white splotches, which gives you more stylistic options - a broader array of materials and colors will pair well with whitewashed brick than they will with bold red brick.

There are tons of great brick patterns, but if you ask us, patios and spaces meant for lingering prefer less linear patterns, like herringbone or basket weave.

Concrete: $18 - $22 per square foot

Cost-effective, versatile, and super durable, concrete looks great in almost any landscape style. 

You can adjust its color and texture for aesthetic effect, and to improve slip-resistance. Try darker concrete in lush, enclosed spaces, or brighter concrete in sunny, open areas. Use a broom-finish texture to amp up the slip resistance on paths, pool decks and cooking areas. 

Short of asphalt, a basic concrete slab is the cheapest paving option. Even with texture or color treatments, concrete is still cheaper than most pavers. 

While attractive at smaller sizes, concrete slabs feel commercial and cold when they get too large (big slabs also cost a lot). We suggest humanizing the scale by applying a pattern - this could be a diamond or square grid of score joints, or a stamped design. 

Stamped concrete emulates an array of paving materials, from natural stone to complex paver patterns, and is suitable for paths, patios, and and other lighter-duty areas, just don’t use it for a driveway, where it is prone to cracking. 

Tile $45 - $65 per square foot 

Tiles are made from clay or porcelain, and require a concrete base, hence the higher price tag. 

Clay Saltillo tiles are great for Mexican patio designs, and pair well with colorful accent strips of patterned tiles - try these patterned tiles on the risers of steps or as a band offset a foot or two from the edge of a seating area. 

Porcelain tiles run the gamut of colors and styles, and are super durable.

In general, tiles are a great choice to elevate the look of outdoor spaces - they look nice - just be careful when using them in a wet environment, as they can get slippery. 

Flagstone in a Yardzen yard

Stone: $60 per square foot

Stone is super durable, and boasts attractive natural color variation that is hard to beat. 

For a natural look, install stone pavers with curving edges. For a more upscale look, go with large stone pavers cut to rectangular dimensions. 

Stone is at the top of the paving price spectrum, particularly if you opt to mortar-set it. 

To offset cost, get local stone. You’ll save on shipping costs, and your stone will evoke the regional landscape. In the northeast, go with bluestone; the northwest, basalt; the southwest, sandstone or Mexican travertine.

Paving Alternatives

Decking: $65 per square foot 

Decking is a structure - even decks built to be flush with the surrounding yard require an underground frame to support the surface planks. 

With the price of wood through the roof, composite decking like TimberTech has emerged as the best option for decking materials - it’s super versatile, easy to work with, looks great, and has a strong sustainability pedigree.

Our advice: build decks where you need them, and keep them simple. Decks can unlock function for yards with tricky terrain, but paving is typically a more cost-effective option in flat spaces.  

Pea gravel in a Yardzen yard

Gravel + Small Stone: $6 - $10 per square foot

Gravel is a workhorse material. It’s cheap, durable, able to be relocated, and attractive (in a rustic way) in a variety of design styles. 

It’s also permeable, allowing water to drain through it - this helps to reduce flooding, erosion, and water pollution.

Gravel looks great adjacent to solid paving, and is great for casual dining areas, fire pits, or raised-bed gardens.

Stick to smaller gravel sizes for paths or seating areas - rock above 1’ diameter is not comfortable for walking on. If children will be playing in it, go with rounded gravel (though we advise keeping babies and toddlers out of gravel - they tend to eat it). Keep gravel separated from the edge of pools by a few feet to avoid kicking it into the water.

For non-walking areas, larger river rock or Mexican pebbles can be applied, either as a decorative material or as a mulch in a planting bed. 

If using a stone mulch, be mindful of sunlight. Stone placed in full sun absorbs heat and warms the soil beneath it, and should only be used with plants that can tolerate heat. Stone mulch in the shade avoids this complication.

As with larger stone paving, look for local gravel or rock mulch to match the look of your region and cut back on costs.

Decomposed granite in a Yardzen yard

Decomposed Granite: $12 per square foot

“DG” costs a bit more than gravel, but offers a smoother walking surface. It’s fairly safe for dogs and kids, though it will scrape the occasional elbow, and can scratch wood floors if tracked inside.

DG is popular in a tan color that evokes rustic southwestern landscapes - corten planters, tan DG, and limestone accents are a classic combination. In the northern US, DG is more common in a cool gray tone, evocative of bluestone. 

Use DG for informal paths and seating areas, the same as you’d use gravel. Separate it from exterior doors with at least a few footsteps’ worth of another material to knock it off your shoes. 

We don’t recommend DG as a mulch. It drains very slowly, forms puddles, and deprives plants of oxygen. For a seamless look between DG zones and planting areas, select gravel mulch to match the color of DG.

Mulch at the base of this Yardzen yard

Mulch: $2 per square foot

Mulch is cheap, portable, and easy to install and replace. The right mulch is safe as a child or dog play surface (check out our blog posts about Dog-Friendly Yards and Kid-Friendly Landscaping), too. It is not, however, going to replace a travertine pool deck. 

Use mulch where it feels fitting: surrounded by planting, beneath tree canopies, in areas with a natural, informal feel. It’s a great cost-effective choice for spaces with a forested flavor, but should generally be avoided for high traffic or high visibility zones.

Artificial turf is a great, water-smart solution for many yards

Artificial Turf: $20 per square foot

We tend to think of artificial turf as softscape, but it’s perhaps the most versatile landscape surface available. Turf is easy to maintain, generally quite durable, and can be very attractive. Functionally, it turns on a dime from play area to picnic zone, and can even be used as a pool deck substitute.

Turf gets hot in direct sun, and tends to degrade more quickly with prolonged sun exposure. It pays to invest in higher quality turf products - they perform better and last longer, generating a lower lifetime cost than cheaper materials.

Check out our Guide to Grass Alternatives to learn more about turf!

Gray decomposed granite in this Yardzen yard — a beautiful and inexpensive solution to paving

OUR ADVICE

Surface materials are a principle tool for designers to define spaces and establish a style in a landscape. A little up-front investment can save you down the road  - higher quality materials tend to last longer and require less maintenance. 

This said, don’t go overboard - target the priority areas for nice paving, and lean on more cost-effective materials for secondary zones.

Whatever material you choose,  make sure it complements not only your landscape but your home’s exterior as well. Explore our Exterior Design packages.

Our advice: keep it simple. Limit the number of materials you use, and the amount of paving you install. This will ensure a cohesive appearance, and keep your costs under control.

Kid-Friendly Landscaping

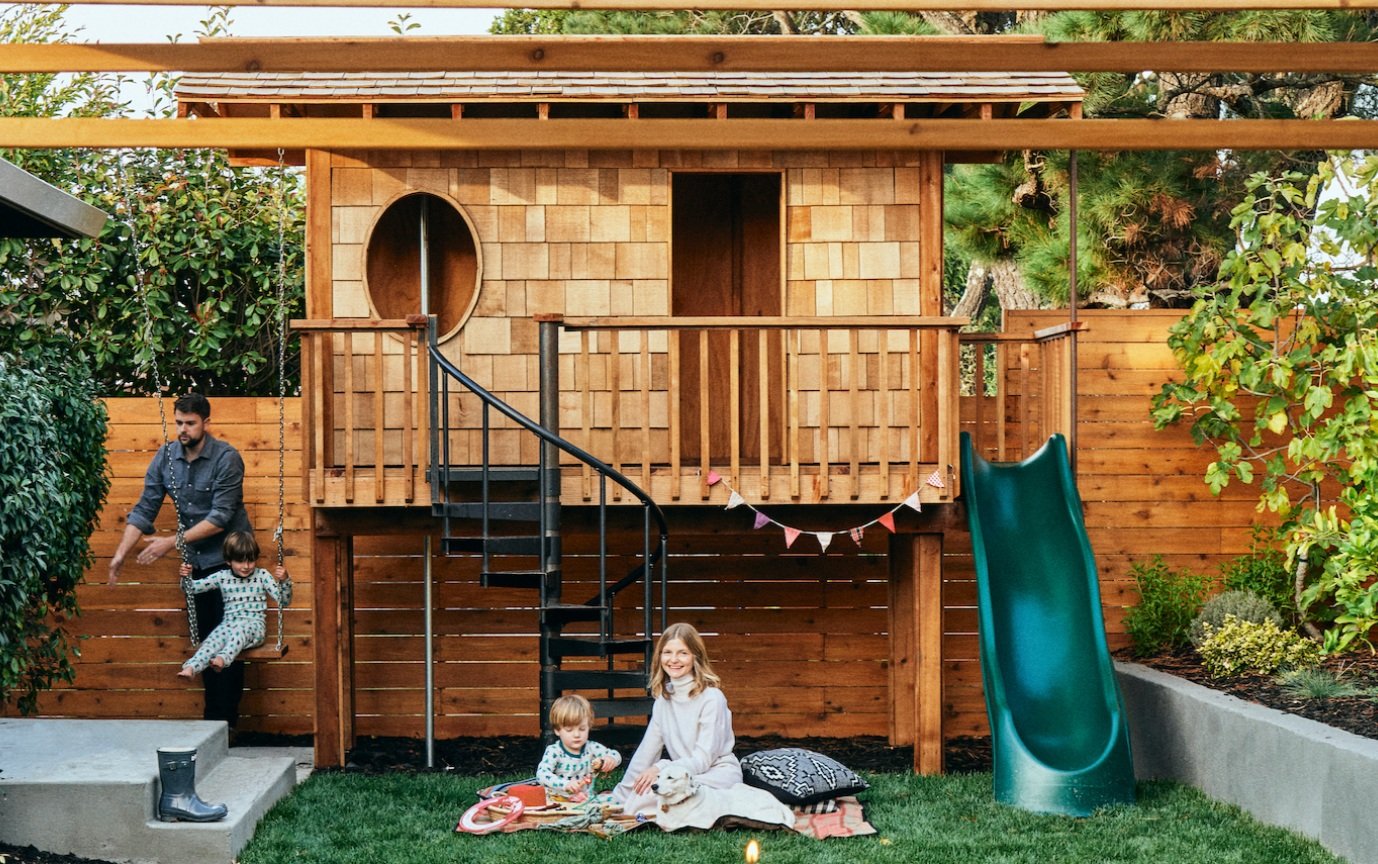
A kid-friendly Yardzen yard. Read the blog post!

There are two main goals when designing a kid-friendly landscape:

  • Protect kids from the yard.

  • Protect the yard from kids.

As designers, we’d add to this:

  • Create a fun, enriching environment for children.

  • Make sure adults love the yard, too.

Safety is a clear priority, but so are look, feel, and function. A kid-scape only works when it is attractive, functional, and enjoyable to be in, otherwise neither kids nor adults will use it. Below, we’ll share some tips for how to design a kid-friendly yard that works for the whole family. 

Protect the Kids

Fence your pool

This is often required by law. Depending on regulations, you can plan to remove your pool fence once kids reach a safe age. In this event, design pool area hardscaping for use with and without a pool fence, to accommodate present and future conditions.

A Yardzen front yard for play, including a gate to keep little ones contained.

Fence your yard

Keep little ones from bolting by installing a fence they can’t squeeze through. Keep gate handles high enough to evade toddler hands, and make sure no gaps in the fence exceed 4” to avoid getting hands or heads stuck in the fence.

Keep play spaces in view

Whether viewed from inside the house or from outdoor adult areas, position children’s play areas to be easily visible. 

Pro Tip: Locate play areas next to outdoor “living rooms” where the family can gather. This gives children the opportunity to flow between adult and kid zones, and incorporates the family into outdoor play.

A Yardzen backyard designed for play!

Explore safe play surfaces

  • Lawn is a versatile play surface that can double for adult uses like picnics, but it requires maintenance and lots of water to survive, and suffers under heavy foot traffic. It also offers less fall safety than some other surfaces listed below. 

  • Artificial Turf is equally versatile, and can offer a little better fall protection. It’s also easy to wash - use an antimicrobial solution to clean away pet waste.  

  • Rubberized play surfaces are quite safe, but not particularly attractive. We don’t generally recommend them for areas of high visual impact.

  • Playground mulch is rounded, splinter free, and installed to a minimum 6” depth. It is perhaps the safest play zone surface, but it requires tall edging to contain it, and is probably overkill for areas that don’t feature tall play structures.

  • Bark mulch, installed at a depth of 2” - 4” (just as you would in a planting area), is great for play areas without tall structures, and will look “adult” enough to be cohesive with the rest of the yard. Being a loose material, it can get messy - we recommend it for areas where fuzzy boundaries won’t be an issue, such as spaces bordered by planting. 

  • Pea gravel (the rounded kind - not angular gravel) is often the most aesthetically attractive play surface, but it has drawbacks. It’s not great for fall zones, and smaller children are prone to throwing or trying to eat it. Like mulch, it’s a loose material and can get kicked all over. We talk to lots of parents - some love gravel, others are sick of sweeping it up. 

  • Decomposed granite is a viable play surface, though it will skin knees and elbows. 

    • Unstabilized DG is a little less apt to scrape but more slippery when kids run on it. 

    • Stabilized DG feels a lot like asphalt - more grip, but worse scrapes. 

    • DG can be a great solution for spaces that need to double as adult and kid zones.

Paving is not suitable beneath structures where kids may fall, but it is fabulous for certain sports or toys with wheels. Keep gaps between pavers to a minimum for a smooth ride.

The children of Yardzen’s co-founders enjoying their kid-friendly yard

Explore safe play surroundings

  • Avoid sharp objects: Choose rounded plant containers over ones with sharp corners. 

  • Avoid trip and slip hazards: Inspect paving and decking for cracks or defects that may cause a fall. When selecting decking or paving, be sure to consider slip resistance - precast pavers and composite decking products (we suggest Timber Tech) will have slip data available. Concrete can be textured to provide a desired level of slip resistance.

  • Mind fall risks: Use guardrails, plant containers, or other furnishings to keep small kids from going over the edge of elevated decks or patios. Don’t go overboard - it’s a good thing to have some features in the yard for bigger kids to jump off.

  • Avoid sharp or toxic plants: Kids are less likely to eat plants than pets, but it’s still best to avoid toxic plants (including plants linked to severe allergies) in a kid-scape. The Bump shares a useful list of plants to avoid (bye bye lilies, oleander, foxglove, and holly). Sharp plants pose a more consistent threat. Choose species without large thorns, spikes, or spines. If you must, position sharp plants in the interior of planting areas, away from path or play area edges.

Protect the Yard

  • Careful with fragile objects: Don’t put delicate decorative elements near play zones. 

  • Be mindful with loose materials: Kids will kick and throw anything they can. Mulch, gravel, and other loose materials can have their place in a kid-scape, but use them where mess is less of an issue.

  • Plant appropriately: Pretend you have large dogs. Choose soft-leaved shrubs and perennials that can tolerate basketballs and footsteps, particularly next to play spaces or running routes. Incorporate some open mulched spaces between masses of ornamental plants - this gives kids an alternative to stomping directly over plants. 

  • Use precast pavers for paved play zones: Pavers can be individually replaced should they get stained or damaged. Concrete slabs don’t have this flexibility.

  • Embrace imperfection: Focus on your kids’ exuberance, not the mess it may create. 

For the Kids:

Let them design

Ask your children what they want in their yard, and bring them into the building process. All too often parents install playscapes that go unused. Kid buy-in is crucial.

Include a variety of spaces

  • Provide spaces of different scales and character to facilitate different types of play - small and enclosed, big and open. 

  • Create a sense of adventure and mystery - use planting to hide and reveal different spaces.

  • Include both hard surfaces (for wheels and basketball) and soft surfaces (for swings, soccer, and play structures).

  • Don’t forget paths - provide routes (formal and informal) for kids to sprint.

  • Work with the land. Use existing slopes for embedded slides or rock scrambles. Utilize existing tree canopies to create shaded play zones that escape summer heat. 

  • Nature play. Natural play features strengthen children’s connection with nature, and look nicer in a yard than brightly colored plastic contraptions. Anchor a few tree stumps or logs in the ground, hang swings or zip lines from trees, or provide a good old fashioned sandbox flanked by planting. 

    Pro Tip: draw your kids even closer to nature by including plants that attract birds, butterflies, and (unless there’s an allergy) bees. Contrary to popular belief, bees are almost never aggressive, and pose very little threat when at work collecting pollen.

  • Flexible Space. Create flexible play spaces that can accommodate a variety of temporary structures, toys, or games. Avoid overdoing it with expensive permanent play structures that target a narrow age range - eventually, your kids will lose interest in them and you’ll be stuck with wasted yard space. 

  • Get crafty. Outdoor craft spaces with tables or chalkboard-painted panels can move indoor activities into the fresh air.

  • Rain schmain. Provide sheltered play areas so your kids can play outside in wet weather. This could mean a structure like a fort, teepee, or yurt, or simply a covered area. A shade sail (or two) tilted at slight angles to drain provides a stylish solution that adults and kids will equally enjoy. 


    For the Adults:

Multi-use hanging chairs — a favorite of both kids and adults!

  • Design for multi-use. Get the most out of your yard by creating spaces that can be used by adults and kids. Choose surfaces and materials that balance adults’ and children’s needs, be they functional or aesthetic. 

  • Don’t sacrifice too much. Compromise is key. Keep the features that make you most happy, let others go to give your kids extra play space. No room for a hammock and a swing set? Go with the hammock and let the kids swing on it. 

  • Plants are important. You may scale back planting a bit to provide more play space, but don’t undervalue your planting. Kids benefit from contact with plants, rocks, and dirt, and play areas look more cohesive when they are intentionally woven into a planting design. 

  • Provide space to store toys. Keep your yard tidy with containers or storage zones that are kept outside of principal yard views.

  • Keep it natural. Use play structures built with a natural palette: rope, wood, metal, earth tones. Don’t be grim - color lends spirit to a yard, just try to get it from plants instead of swing sets
Stay safe, have fun, and enjoy your yard!

Designing a Pet-Friendly Yard

Designing a pet-friendly yard goes both ways: we must protect our pets from our yard, and protect our yard from our pets. Below, we share a few pet-scaping strategies to help you strike this balance.

Protect Your Pet

Safety first. Here are some tips for minimizing risks to your pets in your yard.

Boxwood, which is common in many landscapes, is on the ASPCA’s list of toxic plants for pets.

Avoid Dangerous Plants

To ensure pet safety, we suggest excluding any plant species that pose a risk to pets. Many popular landscape plants are toxic to pets, including Boxwoods, Sago Palms, Rhododendrons, Oleander, and bulbs like Tulips. Lilies are extremely dangerous to cats. Even some fruit trees, including Avocado, Apple, Peach, and Plum, pose a hazard. 

The ASPCA plant list is the gold standard for information on plant toxicity to pets.

A front yard fence in a Yardzen yard

Real, Secure Fences

Make sure your fence will contain your pets - they’re safer at home. Inspect your fence for holes or other escape routes, and patch them up before turning your dog loose in the yard. If your dog is a digger, bury chicken wire under the base of your fence to create a sub-grade barrier. 

We strongly recommend a real fence, and discourage “invisible” electric fences that emit a shock to dogs who cross a buried electrical wire. Invisible fences are linked to upticks in dog anxiety, stress, and misbehavior, and are counterproductive to the goal of ensuring your dog’s well-being.

Any fence with openings narrow enough to contain a dog are viable for dog-friendly designs. For front yards, we suggest visually permeable fences to allow you and your pup to see the world outside. Popular light-permeable styles we recommend include basic black metal fences, wood-framed hogwire fences, or vertical board fences with extra-wide 4” - 6” gaps between boards, colored to match wood detailing in the yard or home.

Whatever style you choose, build the fence to a height that your pup cannot jump over. 

Check out our Guide to Fences to learn more!

Blood, Bone, and Birdseed

Avoid fertilizer derived from animal products like blood or bone. Dogs often eat these products, leading to a host of illnesses. If your yard has bird feeders, opt for seed blends without raisins. Raisins are highly toxic to dogs, and seed commonly falls to the ground beneath bird feeders, where dogs can gobble it up. 

Say No to Cocoa

Mulch makes for an excellent pet-scape material (more on this below), but do not use mulch made from cocoa. Like chocolate, cocoa mulch contains chemicals that are toxic to dogs.

Avoid Toxic Products and Pest Traps

Pesticides and herbicides can pose an even greater risk to our pets than toxic plants. These chemicals can be ingested by eating or even through simple physical contact, and are linked to a range of severe illnesses. 

It’s preferable to avoid chemical treatments entirely, but if you need them, opt for organic products. If using liquid pesticides, confirm they are dry before pets can access areas in which they’ve been applied. If using granular pesticides, dissolve them with water before pets are allowed in areas where they’ve been placed. If physical traps for rodents are placed in a yard, be sure to keep your dog physically separated from them.

Careful with Compost

If you make your own compost, we salute you! That said, don’t let your dogs near your compost pile. They can’t resist eating the decomposing materials, and are likely to ingest dangerous toxins in the process. 

Mind the Sharps

Avoid metal edging or other sharp landscape features that could cut a dog. 

Hanging Items

Injuries can occur when heavy hanging items fall on cats who’ve jumped on them (hanging items, particularly swinging ones, are pounce-bait to cats). If you hang things for storage, be mindful to hang them securely and/or out of reach of your cat.

A shade sail in a Yardzen yard. A fantastic option for creating shade for a pet.

Shade and Shelter

Dogs, especially those who spend a lot of time outside, need shade and shelter to escape heat and inclement weather. 

Trees are our favorite source of shade, and generally a great addition to any landscape design. Include trees in your yard, leaving space beneath for dogs - or people - to enjoy shade. The hottest sunlight comes from the south and west, so shade areas should cheat to the north and east of tree canopies. If trees are not possible, we recommend a shade sail or some other permanent, reliable source of shade to protect your dog from prolonged sun exposure.

Dogs who will be outside in the rain should also have a dry, wind-sheltered place to ride out storms. If your home does not have covered outdoor areas to fit this bill, a simple doghouse can do the trick, just bring your pets inside when the weather starts to get too chilly.

Protect Your Yard

Now let’s turn our attention to the yard. How can we design to avoid damage from our pets? 

Lawns

Dogs cause lots of damage to lawns, be it from digging, frolicking, or doing their business on the grass. You can improve your lawn’s survival chances by opting for a tough species like Kentucky Bluegrass, Bermuda Grass, or Zoysia, but expect to water them heavily.

For a more drought-tolerant solution, replace lawns (or parts of a lawn) with a dog-friendly material like artificial turf, chipped-wood mulch, decomposed granite, or rounded gravel.

Choose a Designated Bathroom Zone

You can alleviate some of the risk to your lawn by training your dog to relieve themselves in a designated area. Choose a spot that is convenient for the dog, or they won’t use it. Try to pick a place that is also distant and downwind from outdoor hangout areas, veggie gardens, and exterior doors.  

Artificial turf is fine for use as a dog bathroom, just give the turf a weekly cleaning with an antimicrobial solution (a 50/50 vinegar/water solution or an enzyme cleaner are popular options). 

Many pros swear by bark mulch as the best material for a dog bathroom, just be sure that it is free from any dyes. We suggest wood chips, which create a soft surface but won’t easily cling to longer fur. 

Gravel is also viable, just stick to decomposed granite (often used in dog parks) or rounded pea gravel (angular gravel hurts some dogs’ paws, and they’ll often avoid it).

Low-lying ornamental grasses are a hearty option.

Plant Appropriately

In addition to being non-toxic, plants in a pet-scape should be selected and planted strategically. Plants in high dog-traffic areas should withstand damage from urine, and tolerate some trampling. Look for perennials and shrubs with soft but durable foliage - ornamental grasses are a good option.

For more delicate plants, plant them densely, with the most fragile species positioned deeper into planting areas, and surround them with an elevated wood, stone, or fence border to discourage dog traffic. 

Follow their Lead

If a dog has established paths in your yard, embrace them - better to provide a comfortable path where your dog already runs than to stubbornly plant over dog routes and watch new plants get quickly destroyed.

Avoid using lawns or groundcover plants for high traffic dog paths. Instead, we suggest paths surfaced with mulch, smooth pebbles, or decomposed granite.

Pro Tip: Expand existing dog paths into a looped running track. Looped paths give dogs space to run wild when the zoomies hit, while steering them away from more delicate parts of the yard.

Pass on Perfection

Pristinely manicured gardens may not mix well with Labrador retrievers, but you can still have a fabulous yard as a dog owner. 

Set reasonable expectations, train your dog to respect key boundaries, and design to maximize pet safety while minimizing mess. 

Do this, and you’ll have a yard that makes you and your dog happy!